

Lath and plaster
Finish mainly for interior dividing walls and ceilings
- 4 min read
- 3 chapters

Related on Lably
Lath and plaster largely fell out of favor in the US, Canada and UK by the 1930s to 1950s because of the introduction of drywall (known as plasterboard in the U.K.), which is less time consuming and requires less specialized training to install. However, genuine plaster is more moisture tolerant and often seen as superior for soundproofing.
Description
The wall or ceiling finishing process begins with wood or metal laths. These are narrow strips of wood, extruded metal, or split boards, nailed horizontally across the wall studs or ceiling joists. Each wall frame is covered in lath, tacked at the studs. Wood lath is typically about one inch (2.5 cm) wide by four feet (1.2 m) long by 1⁄4 inch (6 mm) thick. Each horizontal course of lath is spaced about 3⁄8 inch (9.5 mm) away from its neighboring courses. Metal lath is available in 27-inch (69 cm) by 8-foot (240 cm) sheets.
In Canada and the United States the laths were generally sawn, but in the United Kingdom and its colonies, riven or split hardwood laths of random lengths and sizes were often used. Early American examples featured split beam construction, as did examples put up in rural areas of the U.S. and Canada well into the second half of the 19th century. Splitting the timber along its grain greatly improved the laths' strength and durability. As Americans and Canadians expanded west, saw mills were not always available to create neatly planed boards and the first crop of buildings in any new western or northern settlement would be put up with split beam lath. In some areas of the U.K. reed mat was also used as a lath.
Temporary lath guides are then placed vertically to the wall, usually at the studs. Lime or gypsum plaster is then applied, typically using a wooden board as the application tool. The applier drags the board upward over the wall, forcing the plaster into the gaps between the lath and leaving a layer on the front the depth of the temporary guides, typically about 1⁄4 inch (6.4 mm). A helper feeds new plaster onto the board, as the plaster is applied in quantity. When the wall is fully covered, the vertical lath "guides" are removed, and their "slots" are filled in, leaving a fairly uniform undercoat.
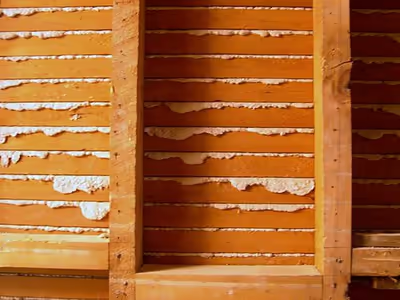
In three coat plastering it is standard to apply a second layer in the same fashion, leaving about 1⁄2 inch (13 mm) of rough, sandy plaster (called a brown coat or browning (UK)). A smooth, white finish coat goes on last. After the plaster is completely dry, the walls are ready to be painted. In this article's photo ("lath seen from the back...") the curls of plaster are called keys and are necessary to keep the plaster on the lath. Traditional lime based mortar/plaster often incorporates horsehair or other animal fiber which reinforces the plasterwork, thereby helping to prevent the keys from breaking away.
Sign in to keep reading
2 more chapters are free with a Lably account.
Historical transition
In addition to wood lath, various types of metal lath began to be used toward the end of the 19th century. Metal lath is categorized according to weight, type of ribbing, and whether the lath is galvanized or not. Metal lathing was spaced across a 13.5-inch (340 mm) center, attached by tie wires using lathers' nippers. Sometimes, the mesh was dimpled to be self furring.
In use as early as 1900, rock lath (also known as "button board," "plaster board" or "gypsum-board lath"), is a type of gypsum wall board (essentially an early form of drywall) with holes spaced regularly to provide a 'key' for wet plaster. Rock lath was typically produced in sheets sized 2 by 4 feet (610 by 1,220 mm). The purpose of the four-foot length is so that the sheet of lath exactly spans three interstud voids (overlapping half a stud at each end of a four-stud sequence in standard construction), the studs themselves being spaced 16 inches (410 mm) apart on center (United States building code standard measurements). By the late 1930s, rock lath was the primary method used in residential plastering.
Lath and plaster methods have mostly been replaced with modern drywall or plasterboard, which is faster and less expensive to install. Drywall possesses poor sound damping qualities and can be easily damaged by moisture. Traditional lime based plasters are resistant to moisture and provide excellent sound isolation.
Advantages
One continued advantage of using traditional lath is for ornamental or unusual shapes. For instance, building a rounded wall would be difficult if drywall were used exclusively, as drywall is not flexible enough to allow tight radii. Wire mesh, often used for exterior stucco, is also found in combination or replacement of lath and plaster which serves similar purpose.
Traditional lath and plaster (including rock and metal lath varieties) has superior sound-proofing qualities when used with lime or gypsum plaster, which is denser than modern drywall.
In many historic buildings lath and plaster ceilings play a major role for the prevention of fire spread. They are critical to the protection of horizontal elements such as timber joisted floors, including the flooring on top, which in terms of fire performance is often in a poor condition due to the presence of gaps.